This easy homemade New York-Style Bagel recipe is simply the best! Basic pantry ingredients transform into deliciously chewy freshly made New York bagels.
This is simply the best homemade New York-Style Bagel Recipe. After so much love (this recipe has received over 11 years worth on here!), I had to share the recipe in Hand Made Baking, and I updated this page with various photos, tons of tips, tricks, and information you’ll need to achieve the most perfect chewy homemade bagels.
This easy bagel recipe is delicious and results in perfection. It does not need as much dedication as other bagel recipes you will find on the web– you do not need to dedicate 2 days to this. It’s a same-day homemade bagel recipe that comes together in 2 hours.
As a native New Yorker, I know there’s nothing better than a fresh bagel schmeared with cream cheese. I have a high standard when it comes to bagels and I don’t put unusual ingredients in mine.
In these bagels, you will not find any yogurt, maple-syrup, or ingredients you might not have in your pantry.
I no longer live in New York City, and I constantly crave the good old-fashioned bagels I grew up on– flavorful, modestly sweet, and chewy with soft, shiny crusts. These bagels are made the classic way: you boil them in water for a couple of minutes before you bake them. This is probably one of the most bizarre things a person can do to dough, but it just works.
This bagel recipe is a very altered adaptation of one from a cookbook, Ultimate Bread, that I borrowed over a decade ago from my aunt. It was my first introduction to homemade bagels. Over the years, this has become the best bagel recipe that I’ve ever made.
It doesn’t require unusual ingredients or require special equipment to make the recipe. These homemade chewy bagels are a treat fresh out of the oven, but when they’re toasted– oh, my! Can we just say that you’ll be making this bagel recipe time and time again?
After making this New York-Style bagel recipe on your own, you will feel a sense of accomplishment and satisfaction. I know I always do! This will definitely give some competition to your local bagel shop- the recipe is that good (I mean, look at the comments!).
This homemade bagel recipe is so good that you’ll be impressed with yourself and totally satisfied after you take a nice bite out of one of these freshly made chewy bagels. So, if you mail order bagels from your favorite spot in New York City and pay $7.50 a bagel, save your money!
And if good bagels cannot be found where you live, worry no more; this recipe is infinitely adaptable, and the little bit of effort you put into making these bagels is well worth it. It’s time to get baking!
Homemade Bagel Recipe Ingredients
This homemade bagel recipe consists of four major parts– making and preparing the bagel dough, shaping and boiling the bagels, the bagel topping, and the things you’ll need to serve them with. Here’s what you’ll need:
The Bagel Dough: The Bagel Recipe Ingredients
- Granulated Sugar: This is used to slightly sweeten the bagel dough and to activate the yeast.
Feel free to use natural cane sugar here if you have it. - Active dry yeast: Yeast is used to help the bagel dough form and rise.
- Luke warm water: This needs to be between around 105ºF/ 40.5ºC and 115ºF / 46ºC; this will also help the yeast activate and bind the flour and other ingredients into a smooth, elastic bagel dough. On the rare occasion, you may need more water than listed in the recipe. The water called for in the recipe is a guide– your ultimate goal is to form a smooth bagel dough that is moist and firm.
- Bread flour: Bread flour contains a high protein content, perfect for making homemade bagels that are chewy. All-purpose flour works here too, they will be just as delicious– just not as chewy as ones made with bread flour (Read: New York-Style Bagel Recipe FAQ located below the recipe in this post for more information about flour alternatives for these homemade bagels).
- Fine-Grain Sea Salt: Salt adds the right amount of flavor to the bagels.
Shaping and Boiling the Bagels
There are many methods in which you can shape a bagel; there is a more traditional method that many bagel shops use– you roll the bagel dough into logs and bind the ends together.
The method used here is done by simply poking the hole in the middle of taught rounds of bagel dough. Once that is done, the bagel rings are gently stretched to about a third of the diameter of the bagel.
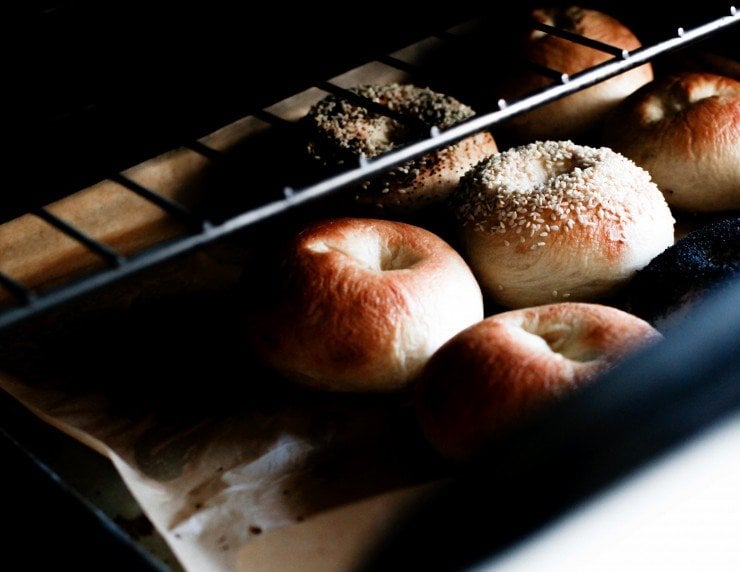
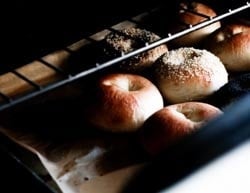
After a short rest, each bagel is boiled. This gives the bagels their New York-Style signature delicious, chewy, and shiny crust.
Read more: New York-Style Bagel Recipe FAQ located below the recipe section in this post.
While you can opt to flavor your poaching liquid (there’s more information about this in the FAQ section), I keep it simple here and just use water and these come out perfect every time.
The Bagel Toppings
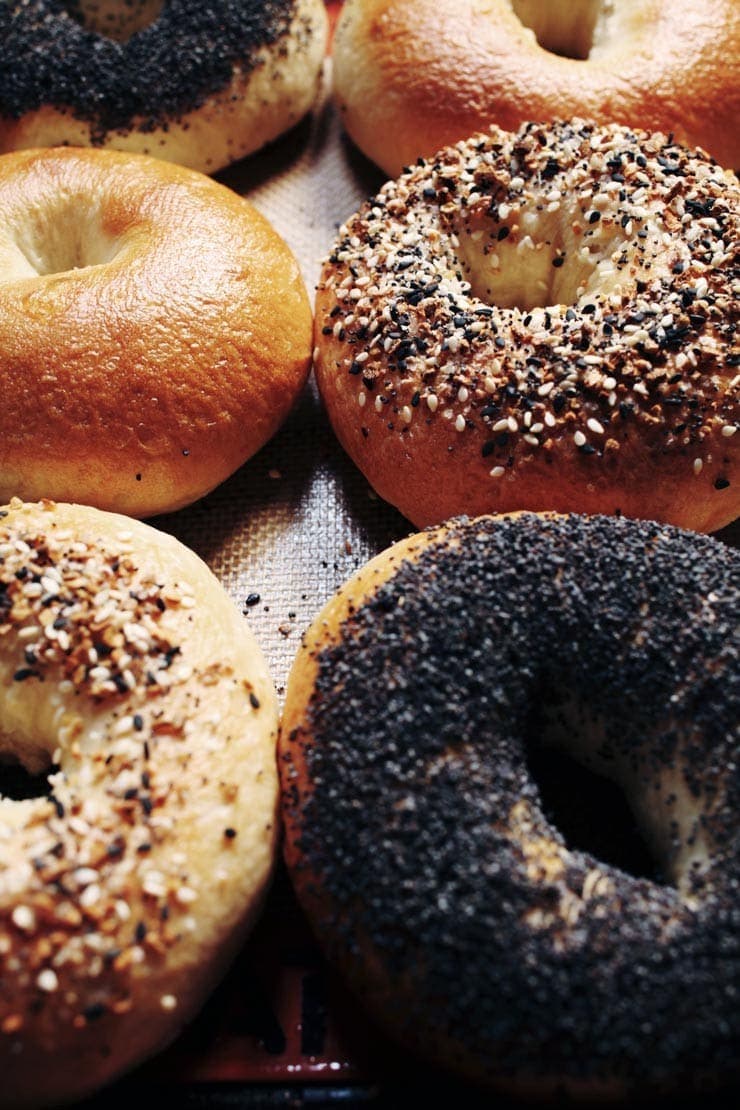
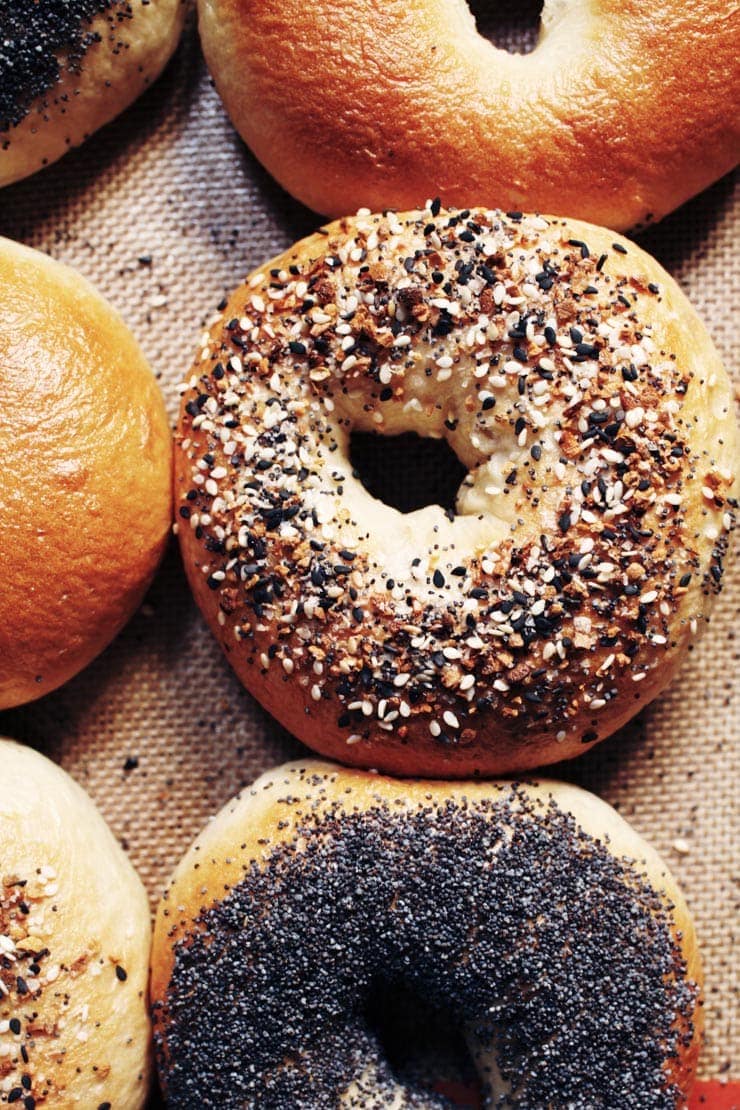
Favorite bagel toppings vary from person to person. Depending on the day, I like a good homemade everything bagel or a poppyseed bagel. I know many people who are partial to single toppings like minced onion or coarse salt. Whatever you like, definitely customize the toppings to match your tastes.
Everything bagel seasoning, minced fresh garlic, minced fresh onion or shallot, poppy seeds, sesame seeds, caraway seeds, coarse salt, cinnamon sugar- these are just some of the many topping options you can go with to customize the taste of your bagels.
What to Serve the Bagels With
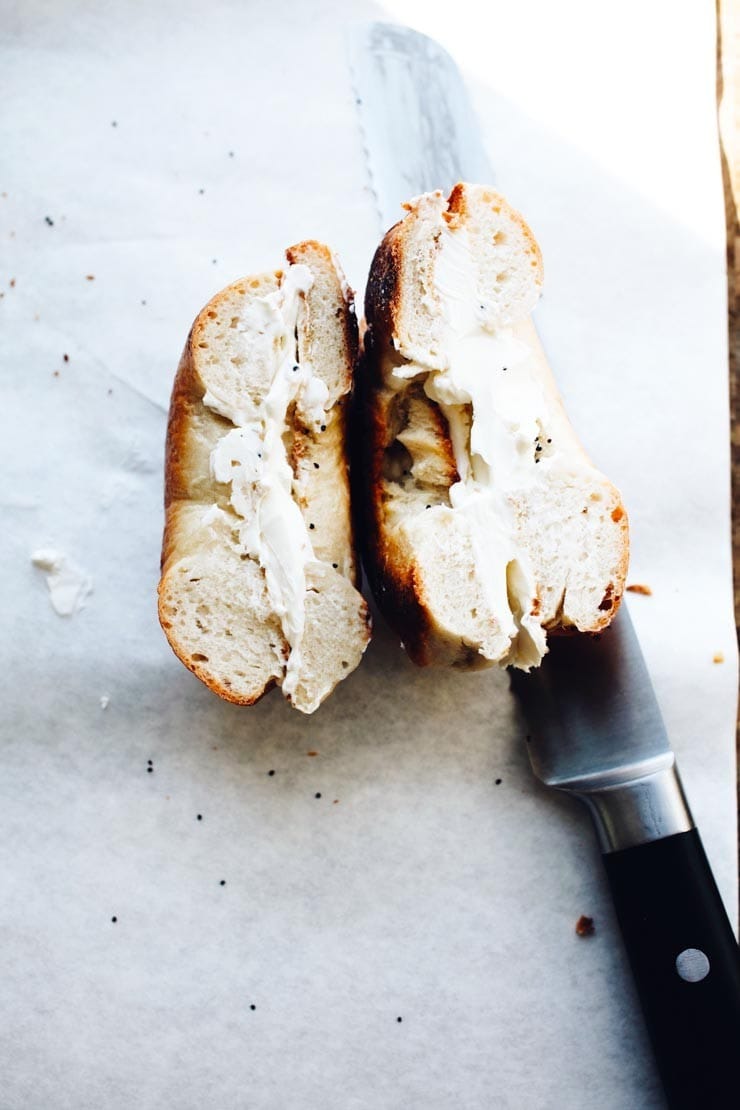
A proper New York-Style bagel always requires a schmear. What is a “schmear” you ask? It’s a generous slather of cream cheese. It’s practically a requirement, especially when these homemade bagels come out of the oven. However, there are multiple ways you can serve them– all of which I have listed within this post.
How to Make Homemade New York-Style Bagels
First, proof the yeast. Proofing basically means you’re activating the yeast. To do this, you will need to add sugar and yeast into luke warm water. After about 5 minutes, the yeast will bubble up; this indicates that the mixture is ready to stir until everything is properly dissolved.
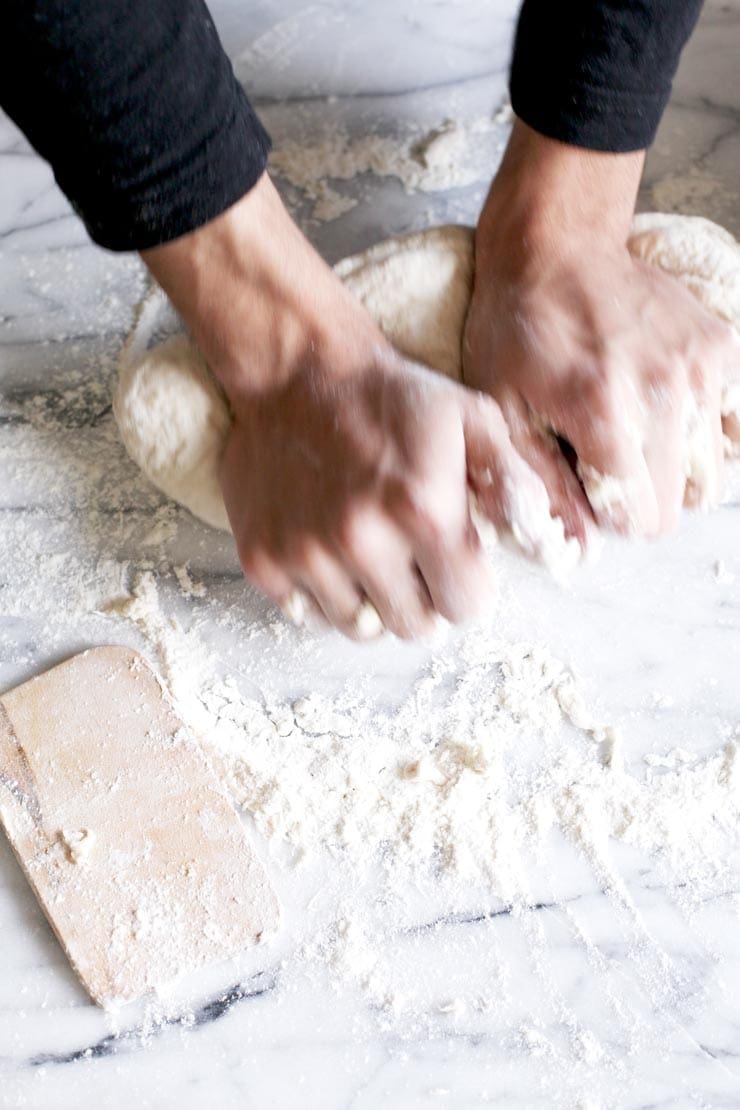
Then, mix the bagel dough together. You can you can opt to make the bagel dough by hand (which I highly recommend if you’re making this recipe for the firs time), or you can do so with a stand mixer fitted with the hook attachment, on the lowest setting (for about 5 to 6 minutes). If you’re making a double batch you might not be able to use your stand mixer for kneading– refer to your manufacturer’s instructions.
When mixing the bagel dough, you may or may not need the entirety of the water called for in the recipe. You want the bagel dough to be moist and firm after it is mixed. Sometimes you may need more water, depending on humidity, brand of flour, your altitude, climate, amongst many other things.
Once the dough has come together and has been kneaded, place the bagel dough in an oiled bowl to rest for an hour (about 2 hours if you’re using less yeast) or covered overnight in the refrigerator.
Once the bagel dough has rested, you will need to deflate it. You will know it has rested enough when you poke the dough with your finger and the impression remains. If it bounces back, the bagel dough has not risen enough.
If you allowed the bagel dough to rest in the refrigerator, allow it to sit at room temperature for about 1/2 hour before working with it.
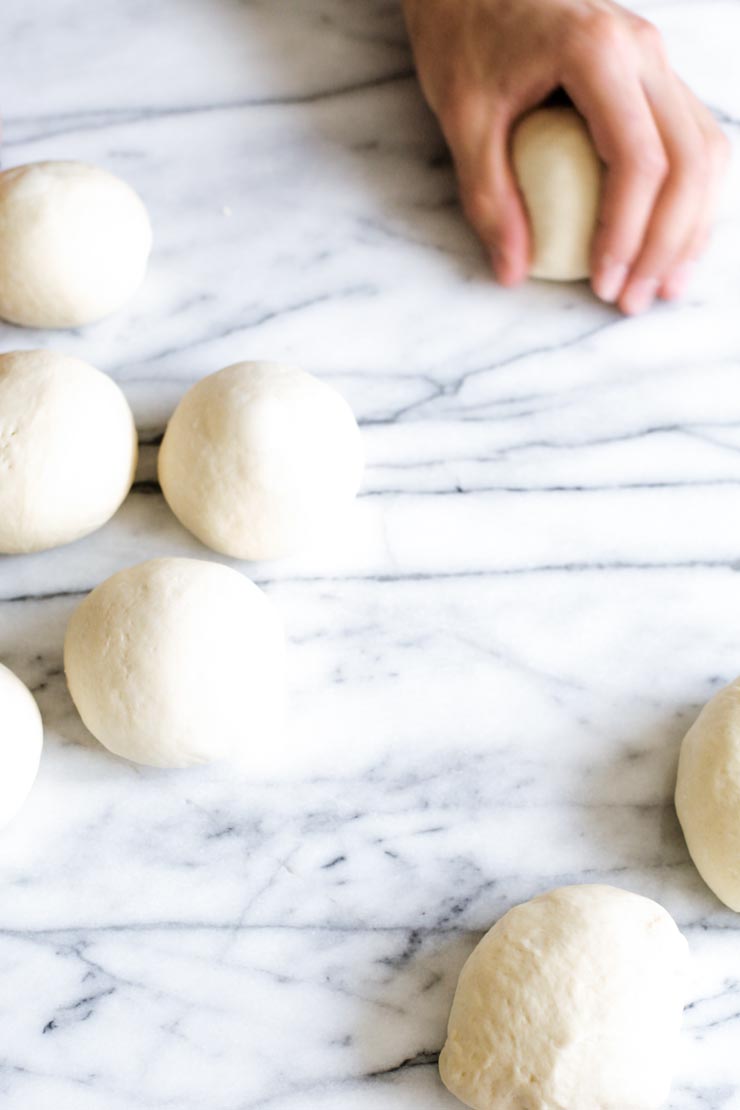
Once deflated, divide the dough. It should be divided into 8 equal portions. Feel free to use a scale or eyeball it. You do not have to be exacting about this; just make sure they’re roughly even so that all the bagels bake at the same time.
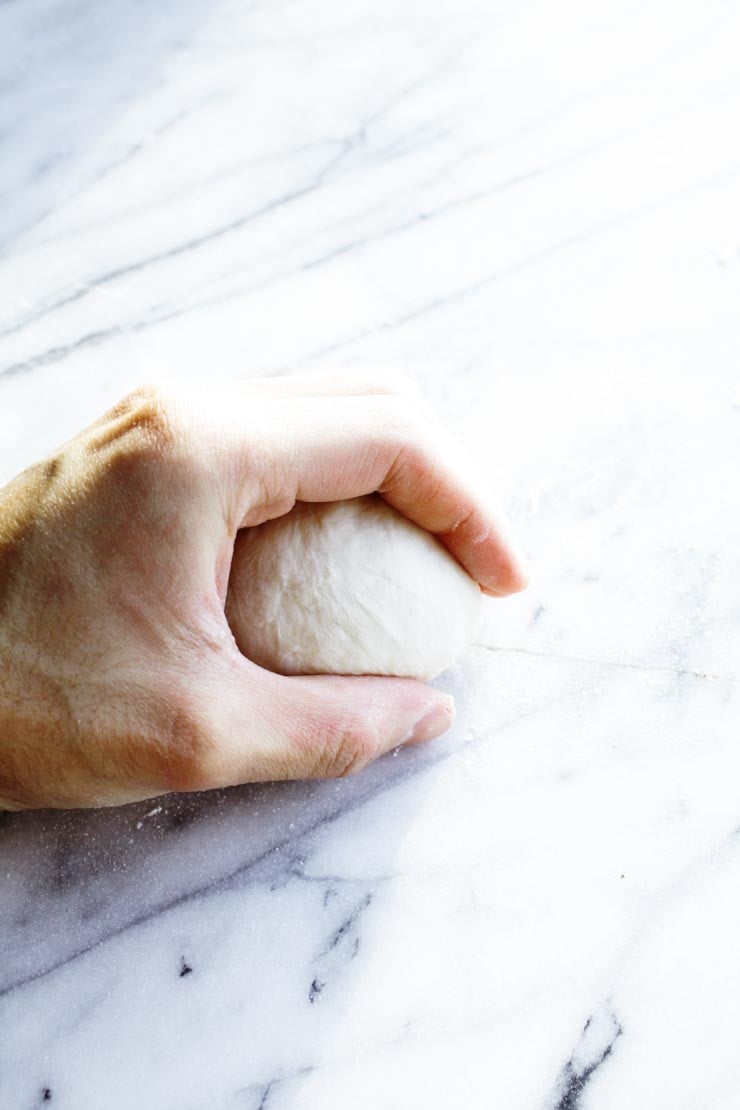
After that, form the bagel dough portions into rounds. Don’t use flour for this step. This is going to sound more complicated than it is, but hold your hand in a C shape while cupping a portion of dough.
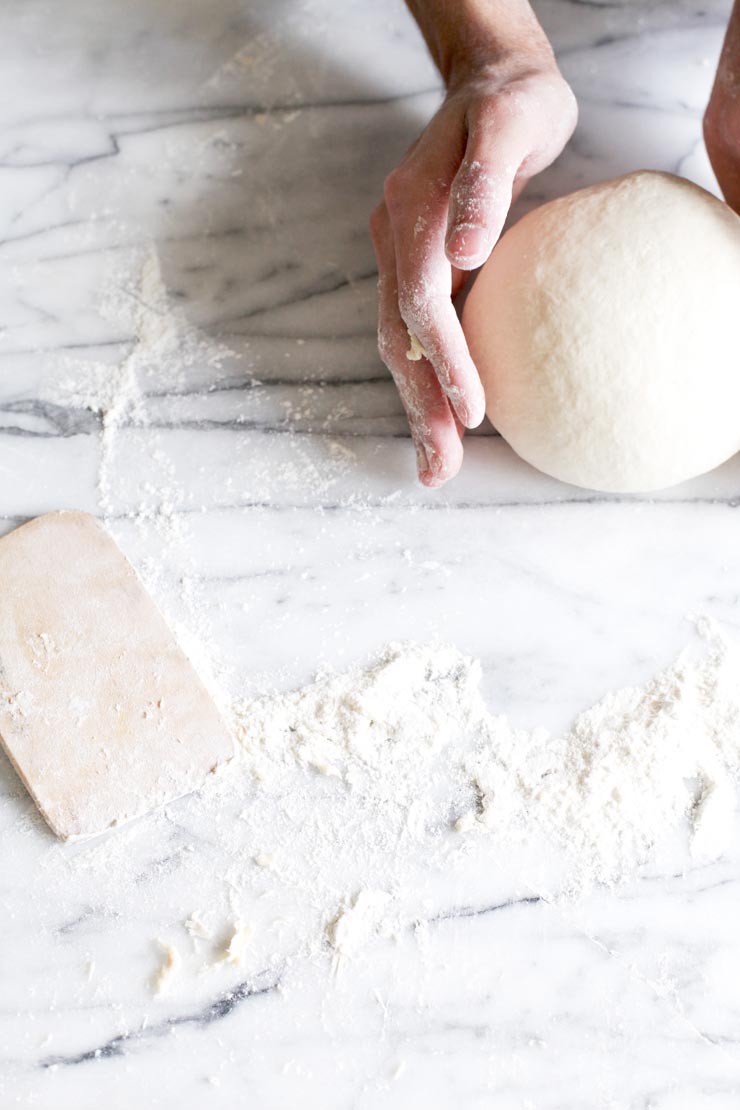
Press the dough against the work surface (remember to avoid flouring it) and move your hand and the dough in a slow, circular motion. Allow the irregular edge of the dough to pull onto itself, while decreasing the pressure on top of the dough slightly until a perfectly smooth round ball forms.
Repeat this with the other portions. Have your eyes crossed? This probably does sound difficult at first, but essentially all you’re doing is making the dough round taut by pulling its sides in and keeping it round.
Now, here comes the part when we shape the bagel dough! Working gently and firmly with the dough will result in perfectly smooth bagels.
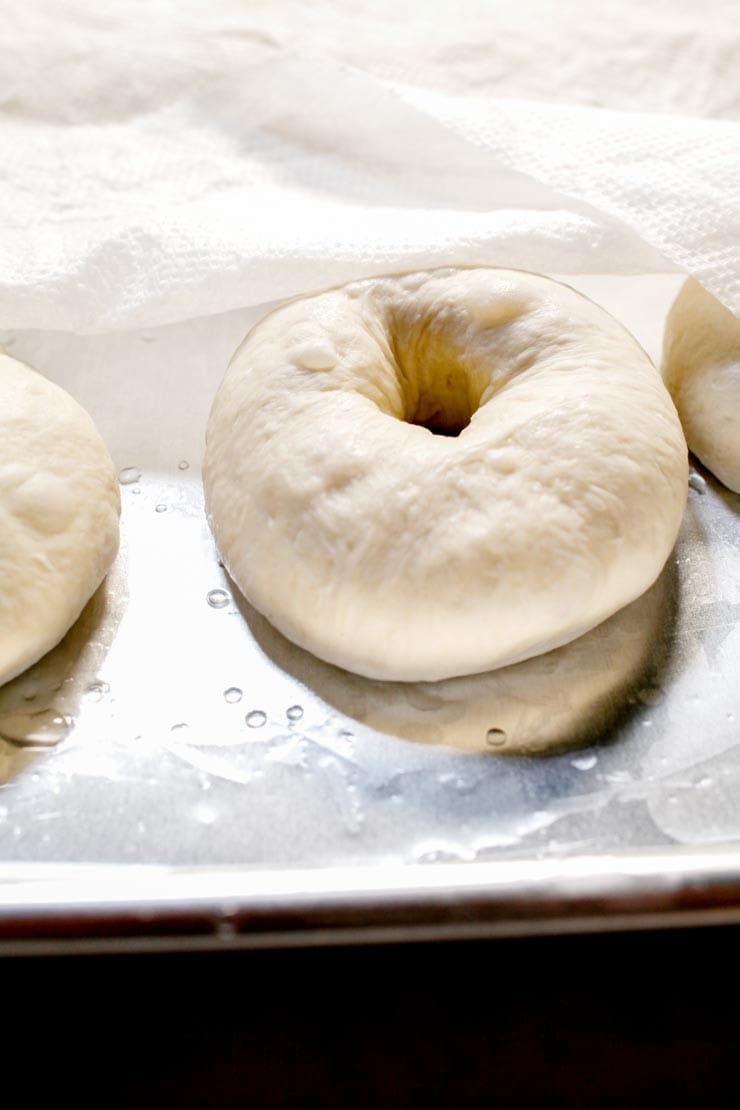
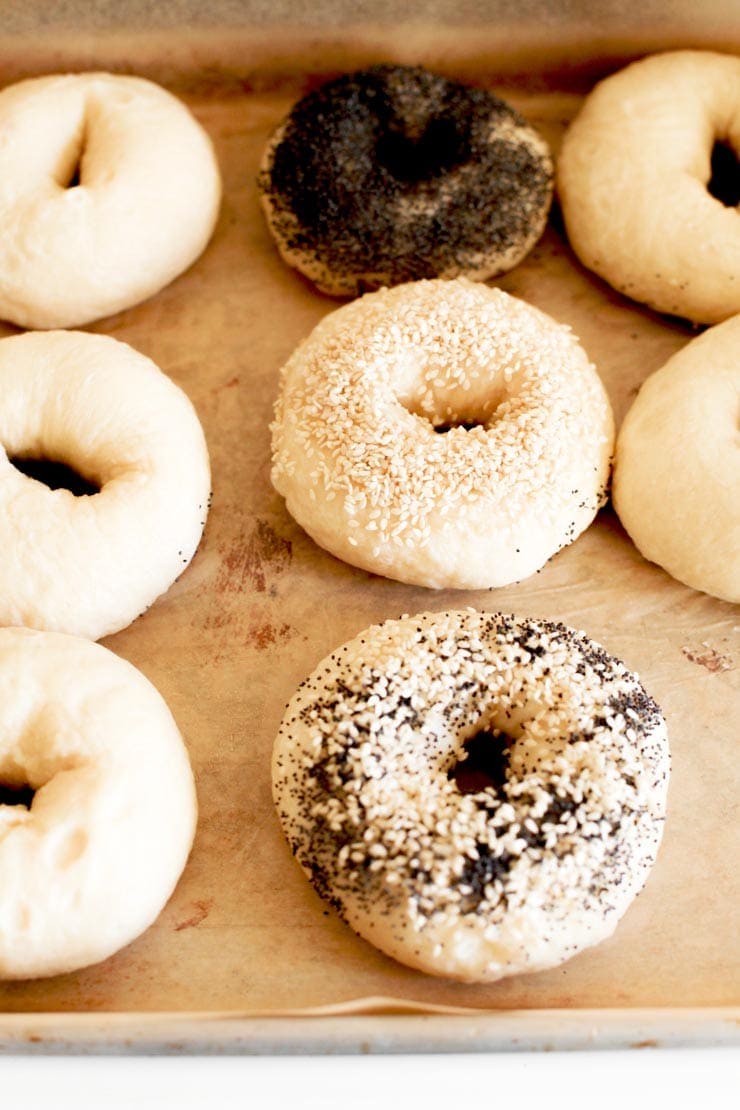
Simply coat a finger with flour and gently press your finger into the center of each dough ball. Then you stretch the rings out to about a third of the diameter of the bagel and place them onto a prepared baking sheet.

It’s time to boil the bagels. The bagels need a little rest in between shaping and boiling. So, while the unbaked bagels rest, bring a large pot of water to a bubbling boil.
Once it has reached a boil, lower the heat to a simmer. You’ll need a slotted spoon or a skimmer to place the bagels into the water. Some folks like to use small squares of parchment that they cut up before hand. Do what is most comfortable for you.
Handling the uncooked dough with the utmost care will preserve their shape as well.
Boil the bagels and don’t overcrowd the water. Boil as many bagels as you can comfortably fit into the pot. They will puff up quite a bit, so do keep in mind they do need some breathing room.
Once in the water, the bagels will float on the top. Let them sit for 1 minute, then gently flip them over to boil for another minute on the other side.
This will give them a nice crust and their signature New York-Style chew. You can go a little bit longer on the poach, as well. This will give them a stronger crust and chew– more on that in the recipe.
After boiling them, top the bagels! This is the time when you can let your creativity run free. You can use any or all of the topping options listed in the recipe.
Often times I do a combination of toppings to make a delicious homemade everything bagel. Sometimes I just keep it plain or stick to one ingredient on each bagel. Be creative!
Once the bagels have been topped, bake them. Depending if your oven is calibrated or not (I like to keep an oven thermometer in mine to ensure it’s always accurate), you will need to bake the bagels between 20-25 minutes. Until they’re uniformly golden brown.
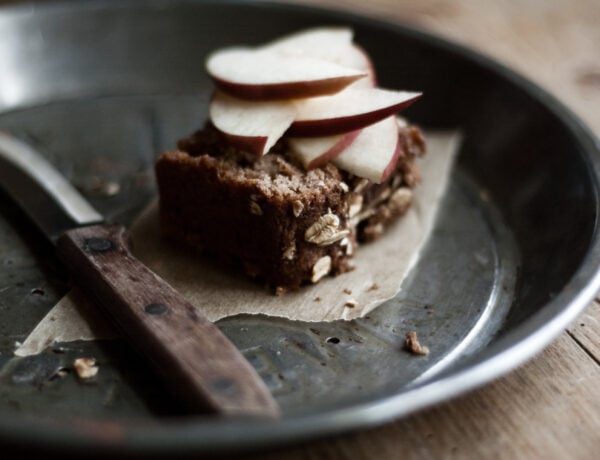
Now, here is the difficult part (not really). You’re supposed to let these cool for at least a few minutes once they’re out of the oven, until you can handle them. If you’re impatient like me, I brave through it, slice one open and schmear some cream cheese on mine right away.
Take a bite… Oooh, child!
Homemade New York-Style Bagel Serving Suggestions
There is no right or wrong way to eat a bagel. However, I’ve listed a few ideas and classic options you would enjoy. A schmear is a classic.
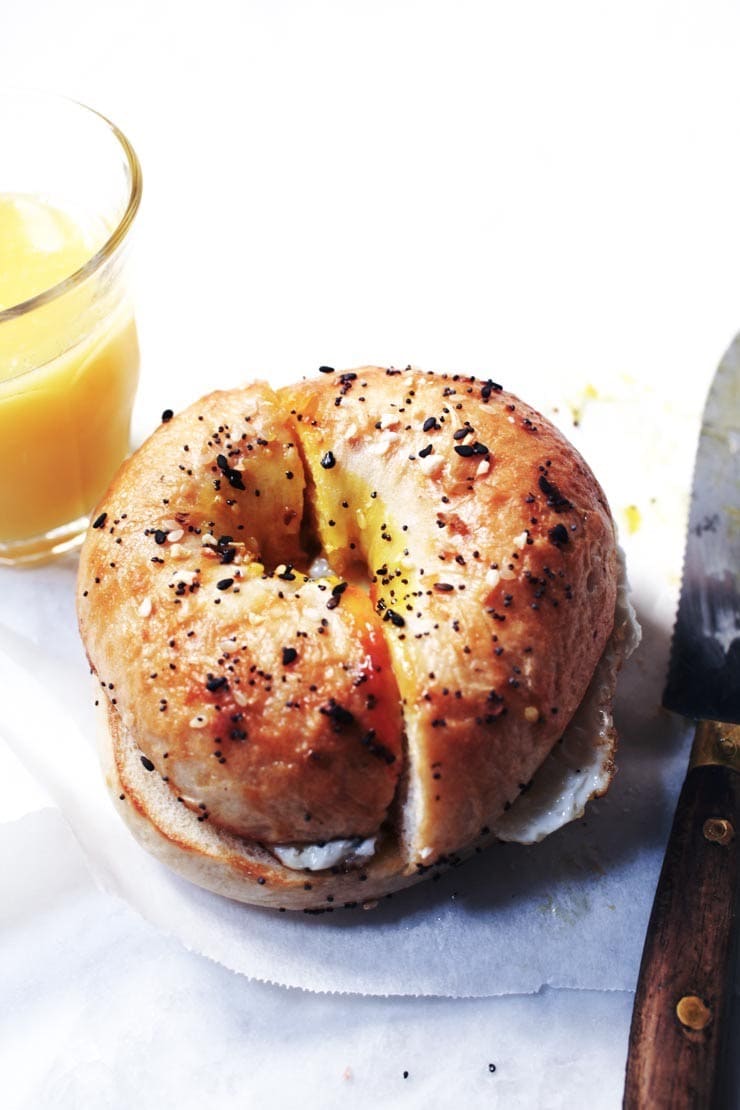
A bagel with lox is also another classic. If you’re looking for a good breakfast idea, go the New York City deli route and make yourself an Egg and Cheese Bagel. Bacon is preferred, but optional.
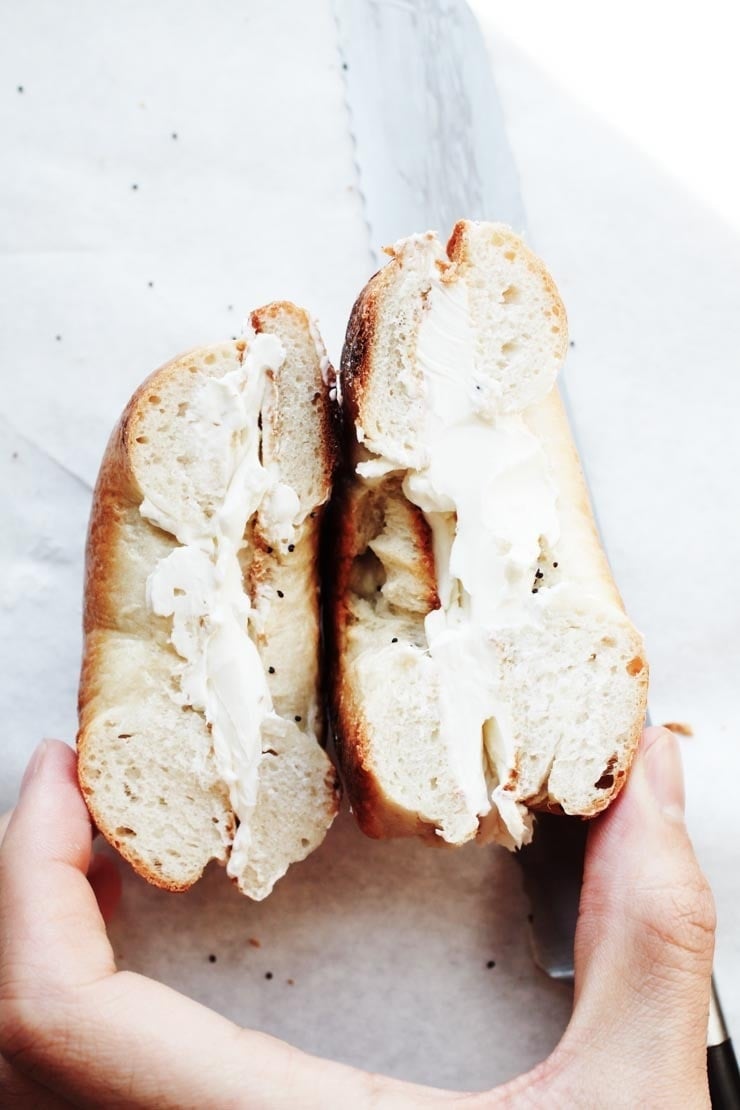
• Bagel with cream cheese– either plain, or your choice of flavored cream cheese. A schmear is a New York classic, and it’s so good.
• Bagel with butter– especially with homemade butter or a delicious French butter. Heavenly.
• Bagel with butter and jam– more specifically homemade butter and homemade strawberry jam– a match made in heaven. Highly recommended!
• Bagel with lox– add a schmear of cream cheese, lox on top, a slice of fresh tomato, red onion, thinly sliced cucumbers, and some deliciously briney capers. Perfection.
• Bagel with Avocado– a nice, healthy option. Toast the bagel, smash a ripe avocado on top, season to your liking, and serve it. Bacon is perfect on top, if you’re into that. Leftover guacamole is also delicious.
• Bagel with Egg and Cheese– this is New York City deli / bodega-style, peeps. Toast the bagel. Butter it lightly. Make an egg and cheese omelet to your liking. Or fry an egg up, over easy, season it with salt and pepper, top it with cheese and bacon. Add ketchup, if you’re into it. If not, add aioli, hot sauce, sriracha, sambal olek, or a combination thereof if you’d prefer that. Cut it in half. You’ll thank me later.
More Everyday Baking Recipes
- New York-Style Soft Pretzels
- Cinnamon Sugar Soft Pretzels
- Perfect Chocolate Cupcakes
- The Best Raspberry and Cream Scones
- Incredible Profiteroles
- Strawberry Pavlova
New York-Style Bagel Recipe
As a native New Yorker, I know there's nothing better than a fresh bagel schmeared with cream cheese. I no longer live in New York City, and I constantly crave the good old-fashioned bagels I grew up on– flavorful, modestly sweet, chewy ones with soft, shiny crusts.
These bagels are made the classic way: You boil them in water for a couple of minutes before you bake them. This is probably one of the most bizarre things a person can do to the dough, but it works. So, if good bagels cannot be found where you live, worry no more; this recipe is infinitely adaptable, and the little bit of effort you put into making these bagels is well worth it.
Ingredients
- 2 teaspoons / 6 g active dry yeast
- 4 ½ teaspoons / 19 g granulated sugar
- 1 ¼ cups / 300 ml warm water (you may need ± ¼ cup /60 ml more)
- 3 ½ cups / 440 g bread flour or high gluten flour (you may need up to 1/2 cup / 60g for kneading)
- 1 ½ teaspoons / 6 g salt
- Optional Toppings: (Refer to Notes)
Instructions
- In ½ cup /120ml of the warm water, pour in the sugar and yeast. Do not stir. Let it sit for five minutes, and then stir the yeast and sugar mixture until it all dissolves in the water.
- Mix the flour and salt in a large bowl. Make a well in the middle and pour in the yeast and sugar mixture.
- Pour 1/3 cup / 80ml of warm water into the well. Mix and stir in the rest of the water (the scant 1/2 cup / 100ml that is remaining), as needed. Depending on where you live, you may need to add an additional couple tablespoons to about ¼ cup/60ml of water. You want a moist and firm dough after you have mixed it.
- On a floured countertop, knead the dough for about 10 minutes until it is smooth and elastic. Try working in as much flour as possible to form a firm and stiff dough.
- Lightly brush a large bowl with oil and turn the dough to coat. Cover the bowl with a damp dish towel. Let rise in a warm place for 1 hour, until the dough has doubled in size. Punch the dough down, and let it rest for another 10 minutes.
- Carefully divide the dough into 8 pieces (I used a scale to be extra precise, but it’s not necessary). Shape each piece into a round. Now, take a dough ball, and press it gently against the countertop (or whatever work surface you’re using) moving your hand and the ball in a circular motion pulling the dough into itself while reducing the pressure on top of the dough slightly until a perfect dough ball forms (as pictured). Repeat with 7 other dough rounds.
- Coat a finger in flour, and gently press your finger into the center of each dough ball to form a ring. Stretch the ring to about ⅓ the diameter of the bagel and place on a lightly oiled cookie sheet. Repeat the same step with the remaining dough.
- After shaping the bagels and placing them on the cookie sheet, cover with a damp kitchen towel and allow to rest for 10 minutes. Meanwhile, preheat your oven to 425ºF / 220ºC / Gas Mark 7.
- Bring a large pot of water to a boil. Reduce the heat. Use a slotted spoon or skimmer to lower the bagels into the water. Boil as many as you are comfortable with boiling. Once the bagels are in, it shouldn’t take too long for them to float to the top (a couple seconds). Let them sit there for 1 minute, and then flip them over to boil for another minute. Extend the boiling times to 2 minutes each, if you’d prefer a chewier bagel (results will give you a more New York-Style bagel with this option).
- If you want to add toppings to your bagels, do so as you take them out of the water. Alternatively, you can use an egg wash to get the toppings to stick before baking the bagels. You may want to use the “Optional Toppings” listed above to top the bagels. Use just one topping, or a combination to make your own Everything Bagel Seasoning.
- Once all the bagels have boiled (and have been topped with your choice of toppings), transfer them to an oiled or parchment-lined baking sheet.
- Bake for 20 - 25 minutes, or until golden brown (I usually err on the side of 20 minutes).
- Cool on a wire rack (Or, if you’re impatient like I am, slice one of these babies open and spread on some of your favorite cream cheese or softened butter. Take a bite… Oh babyyy!)
Notes
Optional Toppings:
Caraway seeds, cinnamon sugar, coarse salt, minced fresh garlic, minced fresh onion, poppy seeds, sesame seeds, everything bagel seasoning, or a mix of your favorite flavors.
Water measurement & similar concerns:
The recipe measurements for the water in the recipe is a guide; not all 1 1/4 cups (300 ml) will be used unless you need it. This is because of environmental factors (humidity, temperature, altitude, etc.) and the flour you are using. The most important thing when making the dough is to make sure it is homogenous and smooth– do not get caught up on the water measurement. If the dough is too firm, add in more water to ensure the dough is not dry and flaky– this has to be done when mixing the dough, not after you’ve allowed it to rise.
For all other concerns, please review past comments and refer to the FAQ below the recipe card for this recipe.
Nutrition Information:
Yield:
8 Medium-Sized BagelsServing Size:
1 BagelAmount Per Serving: Calories: 228.4Trans Fat: 1.4gCholesterol: 0mgSodium: 441mgCarbohydrates: 44.4gFiber: 1.7gSugar: 2.4gProtein: 6g
New York-Style Bagel Recipe: Frequently Asked Questions (FAQs)
The following is a comprehensive list of Frequently Asked Questions I receive about this New York-Style Bagel Recipe. You will find answers to your questions about Yeast, types of flour you can use, and everything you may need to keep in mind when it comes to preparing this homemade bagel recipe and storing the bagels properly.
The Yeast
Can I use fresh yeast?
If you are unable to get active dry or instant yeast, you can use fresh yeast. The general rule of thumb is a ratio of 2.5:1, fresh to active dry. The amount of active dry yeast used in the recipe is only 6 grams, you would need about 15 grams of fresh yeast.
When substituting fresh yeast, you may want to make a few adjustments to the method. Fresh yeast does not need to be proofed like active dry yeast. The water, sugar, and yeast step will be unnecessary in this case, so do keep that in mind. But, as some have told me, they’ve simply substituted fresh yeast for the active dry yeast and followed the steps as directed without any issues.
Can I use instant yeast for this bagels recipe?
You can. Substitute an equal amount. There’s no need to proof the yeast, so add the yeast to the flour with the sugar and jump straight to making the dough.
I prefer less of a yeasty bread-like flavor, how can I achieve that?
You can reduce the amount of active dry yeast to 1 teaspoon in the recipe. Do note: you will have to double the rising time to about 2 hours, instead.
Types of Flour
What if I can’t find bread flour? Can I substitute regular (all-purpose) flour?
If you don’t have access to bread flour, it is okay to use all-purpose flour; they will still come out wonderfully. Alternatively, if you can find vital wheat gluten (it’s usually carried at health food stores), add 4 teaspoons to the all-purpose flour, and you should have a good substitute for the bread flour called for in the recipe.
• Can I make bagels with whole-wheat flour?
Yes, simply use half whole-wheat flour and half bread flour. If you like a milder tasting bagel, you can use white whole-wheat flour.
• Can I use spelt flour for bagels?
Yes. Use 2 cups / 255 g whole-wheat flour and 2 1/2 cups / 315 g sifted spelt four. Alternatively, readers have told me that they’ve made the bagels entirely out of spelt flour with great success.
Preparation
How hot should the water be to proof the yeast?
The water should ideally be between 105F / 40.5C – 115F / 46C.
Can I prepare the bagel dough in my bread maker or KitchenAid / stand mixer?
You can absolutely use either. For a stand mixer: use the hook attachment, and knead the dough on the lowest setting. Do this for 5 to 6 minutes until smooth and springy. If you’re making a double batch, you might not be able to use your stand mixer for kneading. Please refer to the manufacturer’s instructions.
My bagels aren’t smooth. What did I do wrong?
There’s two factors that come into play here: the way the dough is handled and the water the dough is boiled in. Being gentle is crucial to the formation of smooth looking bagels. The less you handle it, the smoother it will be. If you squeeze the dough roughly, it’ll turn out wrinkly. Like many folks, I bake these bagels a lot, and some batches come out smooth and gorgeous, and on bad days some come out wrinkly. It’s all about how you handle the dough, but in the end- it always tastes amazing!
When it comes to boiling, make sure the water is not at a rolling boil. This will also prevent them from looking rough.
How can I achieve an even shinier, sweeter bagel? Can I use barley malt or honey?
Yes! This will achieve a slightly sweeter and shinier product. Use about 1 teaspoon of barley malt in the dough and a generous tablespoon in the pot of boiling water. Because barley malt is not easy to find, I have not made it a required ingredient for the recipe. However, it does add a delicious taste. Alternatively, you can use a couple tablespoons of brown sugar and/ or honey in the boiling water to achieve a similar effect.
Do the bagels need an eggwash before they go into the oven?
No, an egg wash is not necessary, though it does give a beautiful sheen to the bagels. The bagels will be just as beautiful and delicious if you forego the egg wash. This is especially a great option for vegans.
Once boiled, add toppings to the wet, unbaked bagels immediately so that the toppings stick.
My bagels stuck to my pan. What can I do to prevent this in the future?
The original recipe calls for simply using an oiled pan (I’ve edited it). Like many folks, I am paranoid about things sticking to pans, so I use parchment paper or a silpat baking mat (as shown in this post). Feel free to do the same. I do oil the parchment just a bit to add a little bit of extra non-stick protection, but it’s not necessary.
I live at high elevation, what can I do to ensure these come out properly?
I’ve been told by bakers who live at a higher elevation that this recipe works well as is. However, I know that high-altitude baking, especially with yeast, can be a headache as dough tends to rise about 25 to 50 percent quicker than at lower altitudes, so do keep that in mind.
A sure-fire way to ensure that the finished product is not very dense would be to reduce the amount of yeast to 1 teaspoon and allow the dough to rise for the recommended time in the recipe. If the dough has doubled in size after 1-hour, it’s good to start working with. If not, continue to let it rise, checking on it every 15 minutes until doubled in size. Your altitude, brand of flour, humidity, and room temperature are factors that would make the rising times vary.
Can I make the bagels bigger?
You can, just keep in mind that they will need longer to bake. Check on them every few minutes past the 20 minute mark until they are uniformly golden brown.
Make Ahead and Storage
How can I make the dough ahead of time? Can I refrigerate the dough over night?
The best means of making the dough ahead of time would be to prepare it, cover its container with plastic wrap, and rest it over night in the refrigerator. This is called a cold-rise. I often do this and I love this method because it allows the dough to achieve a more complex flavor. If you are doing a cold rise, be sure to allow the dough about 1/2 hour to come to room temperature before working with it.
Can I par-bake the bagels for later baking?
Yes, you can bake them until they are a faint gold tinge (about 10-15 minutes). Cool the par-baked bagels completely before storing them in a resealable bag to be stored in the freezer. To be bake from frozen, bake the bagels for an additional 10-15 minutes, until soft and golden brown.
Can I freeze the bagels? Do they keep well?
Once cool, out of the oven, you can freeze the bagels without any issues. Slice them and then freeze them in a freezer-safe plastic bag, and let them thaw when needed. If you’re planning on toasting them, thawing them is unnecessary.
How long do the bagels stay fresh for?
The bagels will keep in a resealable plastic bag at room temperature for up to 2 days.
Updated May 14th, 2020 – As one of the most popular recipes here and in my book, I’ve received many questions about this bagel recipe. For your convenience, I’ve updated the post with photos, more information, and answers to your Frequently Asked Questions.
Have another question? Leave a comment below!

1,519 Comments
clodagh
September 28, 2020 at 9:39 amAmazing recipe! Thank you
Alyssa
October 29, 2020 at 5:44 pmI felt I could trust this recipe coming from a fellow New Yorker and I was right. Only thing I was missing was the bottom Crust didn’t really develop on bottom of bagel? Any suggestions? I think it may have to do with not putting them on a slotted tray after boiling and before baking?
Logan
December 6, 2020 at 12:24 pmMy bagels were beautiful but the dough was hrs to shape into balls. It wasn’t uniform in the sense that there were cracks and folds in my dough so I couldn’t get it into a pretty little uniform ball. I boiled them for 2 mins on each side and they turned golden brown in the oven but the inside was still doughy. What did I do wrong??
Ali
January 2, 2021 at 6:45 pmThis happened to me as well. I followed directions but the bagels had many folds/cracks. They tasted delicious but looked lumpy. Any suggestions?
Alexa
September 28, 2020 at 9:55 amIsn’t 220 degrees celsius a bit too hight? I dunno if it’s supposed to be so but mine turned crispy outside.
Tabetha
September 29, 2020 at 3:22 amTHANK YOU!!! These were insanely delicious NY Style bagels made at home here in Melbourne, Australia! I even added food colouring after rising to make a small batch of rainbow bagels too. Thank you for all the extra tips too. 2 Mins each side during the boiling stage = perfect chew!
pammijohn
September 29, 2020 at 3:18 pmThis is a great recipe. Bagels were as good as those from a chain I have purchased from in the past. My only issue was that most of the seeds fell off. I applied them after boiling but, after baking, most fell off. Would an egg wash have prevented this? Also, how can I make seeds stick to the whole bagel (not just the tops)?
Paul
November 16, 2020 at 4:23 pmWe like yo have toppings as well. We always use egg wash ( 1 large egg w 1 tbsp water) brushed on each boiled, pat dry, bagel. Them sprinkle your fav toppings and bake.
We like the sesame seed toppings best. Enjoy.
Lisa
October 2, 2020 at 9:49 amHi! I’m just curious if you double the recipe do you double everything, including the yeast?
Avanel
October 3, 2020 at 11:16 amHi I tried the recipe for the first time but it’s over 1 hour and the dough didn’t poof. Advice please.
Kamran Siddiqi
October 10, 2020 at 12:11 amHi Avanel- Your water may have been too cold or too hot, or your yeast was expired.
Beverly R
November 4, 2020 at 4:50 pmI let my dough rise in a bit warmer environment than room temp. I use my oven “proof” function which says is 100 degrees (F). About 1 hour and 15-30 minutes and it doubles. I’ve had more luck with this than room temp. Or, the other things mentioned (old yeast, etc.) could be an issue.
Joanna
November 12, 2020 at 3:16 pmThe temperature of the room can make a big difference to rise times too. The cooler the room the longer the rise time will take. I know in the winter I need to increase my rise times by about half an hour. Go by how the dough looks rather than the clock.
Rupa
October 4, 2020 at 12:54 pmThank you for the recipe. I made these today and they came out really good.
I added grated cheese and picked jalapeños while I reading the dough.
bob mills
November 11, 2020 at 8:01 amGreat out of the oven! I must have missed something though since they’re all chew and no crust the next day. Still good. Just more super market bagel. Will have to try some more times and see, bit I miss real bagels. Thanks for the recipe!
Christine Hess
October 5, 2020 at 7:02 amThis is my third time making these, and I just have to thank you for such an amazing recipe!!! Your directions are concise, you have excellent notes for overnight proofing and the like, and these bagels come out like a dream every single time. Thank you thank you thank you! <3
Zeina Louis
November 7, 2020 at 6:05 amI agree, this recipe is seriously fail proof. I’ve always been intimidated by anything bread like although I’m an avid baker but your recipe has given me so much confidence!
Nadia
December 14, 2020 at 7:25 pmThese were great!!! Reading all the tips and tricks including adding honey to the boiling water was a game changer. I’ve sent this recipe to friends already. My neighbor would like to try a gluten free version. If you gave any thought, let me know!
Jess
October 10, 2020 at 12:06 pmThank you, these were so good! My husband and I just moved out of NYC to the midwest and were craving a good bagel and these were absolutely perfect and very forgiving for a first time bagel maker!
Vama
October 11, 2020 at 5:42 amCould I use Self Raising Flour instead?
Kamran Siddiqi
October 11, 2020 at 6:21 amVama- No, I would not recommend that.
Rosemary B-Chiu
October 11, 2020 at 2:26 pmI’m trying to make the NY style bagels for the first time in my life (I’m 62!)
I can’t find the TEMPERATURE at which to bake the bagels! I see the time, 20 – 25 minutes, but I don’t see a temperature setting! Is it just me, or…..?
Kamran Siddiqi
October 12, 2020 at 3:16 amHi Rosemary, it is indeed listed in the recipe. Please take another look at step 8.
Kris
October 12, 2020 at 11:06 amHi,can I add raisins or blueberries to the dough?
B
December 5, 2020 at 1:32 pmI freeze fresh bluberries and add to kneaded dough. You will need to add more flour to knead in . I knead until consistency is back to same as without berries.
Terese
October 12, 2020 at 3:14 pmWOW!!! THESE ARE FABULOUS! I live in NY but due to COVID, I haven’t had any desire to go out to eat yet, but boy am I really craving a NY bagel! I stumbled across your recipe/website. I just made a batch, and these are PERFECT! Totally enjoyed an egg and cheese sandwich on a delicious sesame seed bagel for lunch. Thank you for this amazing recipe! :)
Tamara Nikolajew
October 14, 2020 at 3:50 pmHello. I’m asking about doing a cold rise. So you’d just make the dough. After kneading it, just put it in the fridge overnight. No need to let it rise some more at room temperature? Just take it out and let it come to room temp, maybe 30 min and continue with recipe? Thanks for any tips!!
Kamran Siddiqi
October 14, 2020 at 4:02 pmTamara- that is correct! Just let the dough double in size overnight in the refrigerator, then allow the dough to come to room temperature for about 1/2-hour before working with it.
Tamara Nikolajew
October 16, 2020 at 5:43 amThank you very much! I’m actually making Montreal bagels which are slightly different and require less rising generally speaking . Do you think an overnight rise would work for Montreal bagels ? Any suggestions ?
Scott Shapiro
October 17, 2020 at 9:59 pmHi,
Great Recipe so tasty, and I’ve made them about 10 times! One question. The bagels always puff up during boiling, and look great. Only twice have they stayed puffed up during the baking process, most other times the bagels get kind of flat while baking… i cannot figure out why they flatten out? Any thoughts? They always taste great- btw, I add 1 T of malted barley to the water.
Stephanie
October 21, 2020 at 5:16 pmI’m not the recipe author – but typically your bagels will deflate after boiling if they are overproved or handled too roughly. Double check that you’re proving your dough properly. :)
Kim
October 20, 2020 at 2:44 pmExcellent recipe! First time ever attempting to make bagels and they turned out great. Thank you so much…although it could be extremely dangerous due to how delicious they are.
Elizabeth
October 21, 2020 at 10:08 amHello. The recipe calls for “3 1/2 cups flour (you may need up to 1/2 cup for kneading).”
Does the measurement include the 1/2 cup for kneading?
Jenny
October 23, 2020 at 11:28 amHi I am wanting to use spelt flour but am a bit confused as the original recipe calls for 3 1/2 cups of flour but it says if using spelt use 4 1/2?
Genevieve
October 24, 2020 at 7:29 amAre you able to make cinnamon raisin bagels with this recipe ? When would you add the raisins ?
Thank you!!
Erin
December 10, 2020 at 8:33 amI added the cinnamon and raisins after letting the dough rise. They came out delicious, but the raisins weren’t very evenly dispersed! From another recipe I read a suggestion that you push the raisins in with a finger and then knead, but I haven’t tried it out yet.
Dave C. Stout
October 26, 2020 at 7:48 amAfter boiling and before baking my bagels look like a flat tire. Should I let them rest to inflate again or what should I do ?
Michael B
December 28, 2020 at 3:54 amIt sounds like you over proofed your dough.
Michael B
December 28, 2020 at 3:59 amMore info on over proofing. Over-proofing happens when dough has proofed too long and the air bubbles have popped. You’ll know your dough is over-proofed if, when poked, it never springs back. To rescue over-proofed dough, press down on the dough to remove the gas, then reshape and reproof.
Patty
October 26, 2020 at 4:23 pmThe bomb! Thank you, thank you, thank you!
Melanie
October 27, 2020 at 10:05 amThis is so great! I live in Germany and you can’t find a decent bagel around here. Brings back great memories of living in Boston! Absolutely fantastic!
Mary U
December 18, 2020 at 3:43 amI live in Germany too and agree! I’m hoping this fills my craving. The dough is rising now.
Dana Dunnington
October 27, 2020 at 1:00 pmEvery Monday, at work, our pantry was filled with bagels, donuts & muffins and I’ve missed it (along with seeing all my co-workers) so I decided to give it a try … even made my own Everything Seasoning. These are 1000 times better than any store-bought bagel I’ve tried. I’m pretty impressed and would definitely make them again.
Louisa
October 27, 2020 at 6:38 pmThis is a perfect recipe!! All the bagel shops in my town have slowly left, leaving me with no good bagels to buy and I will never spend money on the mass-produced grocery store “bagels” which are just a squishy, doughy mess.
I’ve made these once and they were such a good texture and flavor. I might add more salt the next time, since with the sugar amount for yeast feeding, they’re a little sweet for my taste, but the chewiness and the crustiness is absolutely perfect. I can’t wait to make more of these and try out different toppings!
Thank you for sharing this recipe!
Mark Pancer
October 27, 2020 at 8:53 pmHi. I just made some bagels following your recipe, and they were delicious! The only problem was the appearance. In the picture attached to your recipe, the bagels were nice and puffy-looking. Mine came out a bit flatter, and kind of dimpled looking. Any ideas how this might have happened? They seem to deflate a bit when I take them out of the boiling water.
Thanks for a great recipe!
Mark
Fey Gilo
November 18, 2020 at 1:02 pmThis happened to me a few times when trying to make bagels. It turns out it happens if they are over proofed. Maybe you left them a little to long before boiling? It would drive me crazy because half my batch would be perfect and the other half was just flat dimpled dense pancakes. I hope this helps.
Pamela Ingram
November 22, 2020 at 12:22 pmI did the overnight in the fridge method for proofing (left in fridge for 12 hours in a greased bowl covered tightly with plastic wrap) and it was the first time I didn’t get flat bagels.
cynthia lester
October 30, 2020 at 5:56 pmIf you want to make sourdough bagels how would you adjust your ingredients
Robin
October 31, 2020 at 5:30 pmSorry if this has been asked. What is the best amount of yeast to use if you are doubling? Thank so much!
Desiree
November 3, 2020 at 9:05 pmI am excited to try this recipe. Being from Long Island update bagels are just mediocre. I love egg bagels and cinnamon raisin bagels, any recommendations to adapt this recipe for both variations?
Lisajoy
November 7, 2020 at 11:42 amI made this recipe for the first time and they really came out great. I am trying to adjust the recipe to make Egg bagels. I have read you have to adjust the water levels, but really want to use your recipe, it’s so much easier then others I have found. Have you made Egg bagels and can you share your recipe adjustment? Thank you, these were really good.
ashok
November 17, 2020 at 3:47 amThanks For sharing this great bagel Recipe. My Family Loved it. I am definitely sharing this recipe and this website with my friend. Hope they also love it. Thank you again for sharing such a great recipe!!
Edwin Callen
November 20, 2020 at 11:35 amI made this last night it tasted very good, although my dough was not firm at all and I had to add a lot of extra flour.
Pamela Ingram
November 22, 2020 at 12:20 pmAfter two other recipes that produced flat (but yummy) bagels, I tried this one and they were so good! And not flat!!!! I did the overnight in the fridge method for proofing and it was wonderful. Highly recommend this recipe.
Leslie R
November 23, 2020 at 9:13 amHello,!
I have made these several times and they are amazing! Never fails every time I make them. I would like to make a few batches of dough and freeze it to have some dough ready whenever I want to make more. At what step do you suggest it’s best to freeze the dough? And what is the best method to freeze to dough to still achieve a delicious bagel?
Any suggestions would be helpful, thank you!
Jeanzen
November 23, 2020 at 4:29 pmHi. Is it 300ml warm water or 200ml? In the instructions, it said to put yeast into the 120ml of water and then later add the 80ml. I couldn’t find the othwr 100ml. Thanks!
Kamran Siddiqi
November 25, 2020 at 2:38 amJeanzen- I’ve added a little notation about this in the recipe card itself as this seems to be a popular concern. Please refer to the notation in there recipe as it will offer you a little insight about the 300ml… You may not need all 300ml or you may need more than that depending on the type of flour you are using and various environmental factors. The water measurement is not the end-all-be-all for the recipe as it is a guide more than an exacting measurement since we are making bread and not a cake or pastry. I hope that helps! :)
Amber
December 6, 2020 at 4:15 pmTotally fool-proof recipe!! I’m very inexperienced in the kitchen but this recipe was a hit! Topped my bagels with extra sharp cheddar and some jalapeños :)
Sarah
December 6, 2020 at 9:27 pmI could not find the question– I would like to add chocolate chips or blueberries or raisins and cinnamon or….. What step do you add to them? I’m thinking right before the kneading.
lindsay weir
December 10, 2020 at 3:52 amHello! I too would like to ask about the quantities (more specifically the amount of yeast) for doubling the recipe? Thanks
adina
December 18, 2020 at 4:25 amhi, i wanted to ask if it’s ok to use gluten free bread flour in this recipe? thanks
Kamran Siddiqi
December 18, 2020 at 6:22 pmHi Adina- Yes! There have been some previous commenters who have made this recipe successfully with gluten-free flour
Phyllis
December 19, 2020 at 5:03 pmI have a load of bread flour to use up and decided to try making bagels. This was my first time doing it and this recipe was a thorough dream to follow. My only adjustment was I used a tsp of table salt bc my kosher salt was coarse and I wasn’t sure if it would distribute as evenly as a finer salt. This worked out well in my stand mixer – ran it on the lowest setting and tapped in about a half cup of flour as it was kneading on the hook for about 6 mins. Opted for a cold rise overnight and used a tbsp of honey in my boiling water for the added color / shine. My bagels puffed up and browned perfectly within the 20 minutes (any more and it would have been too brown). I made open faced smoked salmon sandwiches within a few minutes of pulling these freshly baked beauties out of the oven and they were divine! Will try breakfast sandwiches tomorrow and freezing the other half sliced for future breakfasts.
Jane Eyre
December 23, 2020 at 1:15 amGreat recipe! There is no bread flour where I live so I used pizza flour 00 le Stagioni which has about 15% protein content and it gave better structure than when I used all purpose flour, however it did taste faintly like pizza dough hahaha! My dough wasn’t very stiff like the one of the video because of my flour, I suppose, so I got scared while I was halfway through, but don’t worry, they still turn out just fine. Nice recipe, straightforward and comes out great since the first try. Highly recommended!
Abi
December 23, 2020 at 1:55 pmHi! Uhm. So I made the dough with all purpose flour and I mightve over handled it a bit. Then I let it set in a warm place(the oven on keep warm, 190°) and they kinda cooked but I thought it was fine. Then I shaped them, and they didn’t float in the water? I haven’t finished baking them but I have a STRONG feeling they won’t turn out well. What did I do wrong??
Kamran Siddiqi
December 23, 2020 at 2:38 pmAbi- It sounds like you pre-cooked the dough. 190ºF is too warm of a temperature for dough to rise in. Simply placing the bowl in the oven without any settings switched on would be enough for the dough to rise properly.
Eileen
December 25, 2020 at 2:05 pmI’ve tried several recipes and although good, this is a Great recipe, thank you. I find weighing in grams turns out better than measurements. Question: how would I make pumpernickel bagels using this recipe?
Kamran Siddiqi
December 26, 2020 at 4:15 pmHi Eileen- I don’t have an exact recipe for that at the moment, but you would need to substitute some of the flour with pumpernickel flour and add some dutched cocoa powder as well for color.
Nora
December 26, 2020 at 3:13 amWe made these bagels yesterday for our Christmas Eve dinner. They are fantastic. We followed the recipe exactly as is and bit into the chewiest (in the best way) and yummiest bagels we’ve eaten since moving to California from Chicago 16 years ago. If you’re even thinking about making these, just do it.
I will say, our bagels looked a little rough after boiling them, but they smoothed out beautifully while cooking.
We did use an egg wash and sprinkled with an “everything” mix we happened to have on hand.
We’ve got 2 left and I predict a fresh batch in our future.
Kristen
December 26, 2020 at 8:03 amGreat recipe! I’ve made it many times, but yesterday I did the overnight cold proof for the first time. Wow! I didn’t think they could be improved, but the texture, rise and taste was wonderful! Thanks for this recipe!
Kamran Siddiqi
December 26, 2020 at 4:10 pmKristen- awesome; it’s my pleasure! Happy Holidays!
Mary Keefe
December 31, 2020 at 9:10 amI live on Fogo Island in Newfoundland, but grew up in NJ/NY on best bagels in the world. For the past 4 years I host a New Year’s Day Bagel brunch for our group of friends, mostly xpats who long for a good bagel! I have used only one recipe in the past, and it has been good. Today I am using your recipe! Will do the overnight rise in the fridge. Smoked salmon and Char are defrosting, and excited to see how my bagels rise to the occasion tomorrow morning! Happy New Year!
maya
December 26, 2020 at 3:10 pmi love this recipe soo much!!! can i make the dough the night before and boil&bake it the next day?
Kamran Siddiqi
December 26, 2020 at 4:10 pmMaya- yes, please refer to the FAQ below the recipe card; there are details in that under the “Make ahead and Storage” section.
Barry
December 27, 2020 at 3:45 pmWhat is a reasonable amount of table salt instead of “Fine-Grain Sea Salt”? I read through all 19 pages of comments and (surprisingly) didn’t see this asked. I have kosher salt, but read in a comment response that coarse salt isn’t good to use.
Kamran Siddiqi
December 27, 2020 at 3:50 pmBarry- table salt can be substituted in equal amounts to fine-grain sea salt.
Kelsey
December 30, 2020 at 2:18 pmAMAZING recipe!! Today was my first time making this and WOW! They were super easy to make and tasted just like ones I would get from my local shop. Thank you so much for sharing!
Jay
January 2, 2021 at 12:02 pmThe recipe was amazing! I used a stand mixer to knead dough, which was totally unnecessary because the dough was so easy to work with. I did the overnight rise in fridge and the suggested boil 2 min each side, loading them in Italy with slotted spoon and parchment paper. Handled it carefully (thanks for emphasizing this). I did not do egg wash and they still browned nicely.
Perfect chewy inside and crisp outside , best bagel I ever had. Thanks so much for this recipe what a gem!!!!
Bob
January 2, 2021 at 3:27 pmCan I add vital wheat gluten to the bread flour to give it a chewier texture or is that too much gluten? Also, in another recipe – it says to add baking soda to the boiling water to get the bagels to puff up more. Do you recommend this in your recipe?
Kamran Siddiqi
January 2, 2021 at 3:46 pmBob- You definitely could add vital wheat gluten if you prefer the bagels to be even chewier than they already are with the bread flour; it’s not necessary though! As for the baking soda, I know a lot of people like to add it to the boiling water, but I find that it simply makes the bagels darker (they can teeter on the line of looking like pretzels if you add too much). From my experience, the baking soda doesn’t do too much with puffing. The bagels puff just fine in plain boiling water. If you’re looking to flavor the water and add some nice color, maybe go for one of the options I mentioned in the FAQ section (barley malt, brown sugar, or honey).
jacob silverman
January 6, 2021 at 7:10 pmYou might want to correct a typo I found. In the FAQ in the answer for the question “Can I make bagels with whole-wheat flour?”, change “us” to “use” by adding the missing “e”.
Kamran Siddiqi
January 6, 2021 at 7:40 pmThank you for that! All fixed :)
Matthias
January 8, 2021 at 6:29 amHi, Thanks for the great recipe! I’ve already made it once and it worked out super well.
I have one question: this time I want the dough to proof in the fridge, however it still raises super quickly (roughly doubling in size within 1 hour even in the fridge). I punched it down once, but it’s still blowing up right away.
I definitely didn’t use too much yeast, I even stayed a bit on the lower end with the yeast.
Is it still fine to work with the dough ~8-9 hours later or did it most likely over-proof?
Kamran Siddiqi
January 8, 2021 at 4:59 pmMatthias- I have had the dough left completely risen over night and not had any issues. There’s no need to pinch the dough down once you see it rising in the refrigerator.